Pages

Search

Showing posts with label Dumuki. Show all posts

Friday, October 7, 2011

Chilli Chicken from a Foodlover!!!!

This recipe was the out come of Hurricane Irene. Even though Irene was a destruction to many places along the east coast of US, the after effects of Irene was fun episode for us.

A day before Irene's landfall in New Jersey, we had moved to a small town near Pittsburg, PA for a night. When we returned, our neighboring towns were under water, the rails and most of the roads closed. But lucky enough, our town was not flooded and had power. The only issue was that our town's sewage system flooded and it just stopped working, so our community send a notice warning us "Not to use the flush until further notice." That was hilarious, but it was fixed in a days time so basically we did not face much difficulties unlike few of our friends.

A friend of mine from high school Nirun Raju, I met him after 9 years in New Jersey, which was a surprise for us :);  had his house under water and the bridge leading to his home was washed away during the storm. We asked him to stay with us until everything was fixed at his place. Now I should also mention that he is an excellent cook, who is not a fan of baking but loves to play with fire in your pan kind. But surprisingly he is scared of the mustards and hot oil splattering.

One of these days during his stay with us, Nirun offered to make dinner. He wanted to try out his specialty Chilli Chicken. We went shopping initially to get the ingredients and on the way back his landlord called to inform that the house was all fixed. Nirun was tempted to go back but I told him if he doesn't make that Chilli Chicken, I would kill him. So he had no choice.

We were all set with the ingredients and I offered to clean and cut the chicken. Nirun did cut the vegetables. Briji was nowhere near the kitchen, he was busy in the deck checking out the"lifeguard beauties" at the pool. Once I finished with the chicken, I found that Nirun had also joined Briji at the deck to get a good view of the girls and finally I ended up making Nirun's Chilli Chicken. Of course this was 100% Nirun's recipe, but I MADE IT!!!!


So here you go with the recipe.

Ingredients

Boneless Chicken - 2lb (thighs would be good choice)
Onions - 2 nos
Capsicum/Green Bell Pepper - 1 nos
Garlic cloves - 2 nos
Soy sauce - 4 tbspn
Hot sauce - 4 tbspn (add more if you need spicy)
Corn flour - 1 tbspn
All purpose flour - 2 tbspn
Crushed Pepper - 1 tspn
Oil to deep fry
Spring Onions - 2 nos to garnish (optional)

Method

- Clean and cut the chicken into small pieces. It should be a little smaller than the medium size.
- In a bowl combine all purpose flour, corn flour, crushed pepper and salt. Add 4 tbspn water to make a thick paste. You may add more water, but make sure its not too watery. To this add the chicken pieces.
- In a thick bottom pan, heat the oil. Once the oil is hot, deep fry the coated chicken pieces until golden brown. Keep it aside.
- Cut the onions and capsicums into medium sized dices. Cut the garlic cloves into tiny pieces.
-In a heavy bottom pan, add 2 tbspn oil. Once the pan is heated, to this add the garlic. Saute for 10 secs and add the onions and capsicums.Saute for another 10 mins on medium heat.
- In a separate bowl, mix the soy sauce and hot sauce and combine well. You may use the usual chilli hot sauce that you get in the market. Add this mixture to the vegetables and mix well. Add salt.
- Once the veggies are cooked, add the deep fried chicken pieces and mix well on medium heat. Take off heat and garnish with spring onions.
- Serve hot with rice or rotis.

This is a simple recipe which is extra tasty. Guys try it out. Now for me this recipe was not spicy enough, so customized it a little when we made it the second time by adding a few extra green chillis. Also added 1/2 tspn of homemade garam masala into the thick paste to give it an Indian touch :).


Hope you guys enjoy this as much as we did and a special thanks to a wonderful friend for an amazingly simple recipe.

Enjoy!!!


Wednesday, September 21, 2011

Left over blend with Strawberry & Banana

I had some frozen strawberries left over after the Fresh Fraisier episode. I froze the strawberries so that it does not get spoiled very soon. Somehow both Briji and myself does not like to have the strawberries as fruit. We would not mind having it in cakes, ice creams or even drinks. So I had to do something with these.  I also had some ripe bananas and fresh honey from a nearby farm. So here is my creative recipe.


Ingredients:

Strawberries - 1 cup
Banana - 1
Honey - 1/2 cup
Milk - 1 cup
Heavy cream - 1/2 cup (optional)

Method:

- In a mixer, blend the strawberries, banana and milk together until smooth. You may add more milk if you need it really liquid. This proportion will give you a thick drink.
- To this add the honey and blend it until mixed well. You can also add more honey depending how sweet you want the drink to be.
-In a separate bowl, take the heavy cream and with a hand mixer blend it until stiff peaks are formed.
- Pour the drink in the serving glass, fill it 3/4th. Take the whipped cream in pipping bag and pipe it over this drink. (this step is optional, you may just serve the drink without the whipped cream).


This recipe makes about 4 medium glass. I used less banana so that it does not over power the strawberry flavor.

I could not name this drink, so contributions are welcome and I will rename this post if we have any suggestions from the readers.

Enjoy and will be back soon with more....

Wednesday, September 14, 2011

Kadala Pradaman, an Onam affair...

Onam is the largest festival of Kerala, the southern state of India, which is celebrated by every Malayalee regardless of religion, caste or culture. It marks the homecoming of the mythical King Mahabali who ruled Kerala a long time ago. Onam falls in the Malayalam month of Chingam (Aug/Sept). During this festive day, the ladies drape themselves in settu mundu/saree and gents in kasavu mundu. The celebrations starts with laying down the pookalam (floral carpet) followed by lavish feast sadhya with almost 20 different dishes which is served on the plantain leaf. Celebrating Onam also includes many games. This is also a time when all the family get-together and celebrate.


Its been a long time since I celebrated Onam with my family. Being away from Kerala, this is something you miss out. But the celebration is no less here in US. I think its celebrated in much larger scale than back home. Every year we have many Onam celebrations, with our relatives and friends. This year we have 4 different Onam celebrations, 2 are done and 2 more to go.

One of the celebrations was organized by NJ Malayalees. This is a group formed by few close friends and every year they come together to celebrate Onam. We were also invited to this celebration. The programs included pookalam, sadhya, tiruvathira (traditional dance), songs, skit and games. The sadhya was potluck, each member had to choose a dish. Sadhya was excellent and each dish was delicious. My share in the sadhya was the dessert, Kadala Pradaman (chana dal pudding / payasam). Here is the recipe.

Kadala Pradaman


Making a pradaman in US is much easier when compared to back home. My mom is a payasam specialist and she uses the fresh coconut milk to prepare. The tedious part would be grating the coconuts and squeezing the milk out. But here I use the ready made coconut milk, which makes it much easier. If you are looking forward to try this recipe, my advice is to use the canned coconut milk rather than the powder.

This recipe will serve about 25 nos. I made double this count.

Ingredients:

Chana Dal -  2.5 cups
Jaggery - 500 grams (approx 1 pack)
Coconut milk - 3 cans
Ghee - 1/2 cup
Cardamom - 4 - 5 nos
Cashew nuts - 1/2 cup
Raisins - 1/2 cup
Coconuts cut into small pieces - 1/2 cup

- Pressure cook the chana dal with enough water. Cook it till just 1 whistle and keep it until the pressure is all gone. It should be just cooked well to the right consistency, do not smash it. If there is excess water, drain all the water and keep it aside.
- In a vessel take the jaggery and fill it 3/4th water. Keep the vessel in heat and let the jaggery melt. Don't let the syrup boil, take it off the heat once the jaggery has melted completely. Strain the syrup into another bowl and keep it aside.
- In a pan add 2 tbspn ghee and fry the cashew nuts, raisins and coconut pieces separately. Keep it aside.
-Heat 4 tbspn ghee in a heavy bottom pan/pot. Add the cooked chana dal and stir it until its dry and has mixed well with the ghee.
- To this add the jaggery syrup, 1/2 cup at a time. Each time the syrup is added keep stirring continuously. Keep the heat in medium so that the chana is not burnt. This should become a thick consistency. You can limit the syrup depending on how sweet you need the pradaman to be.
- Mix one and half can of coconut milk with equal amount of water. Add this to the chana-jaggery mixture still on heat. Keep stirring.
- Crush the cardamoms and add this to the mixture. Add fried cashew nuts and raisins.
- Once it boils, lower the heat and add the remaining thick coconut milk. Make sure that no water is added at this time. Mix well. Leave it on heat for 2-3 mins.

The pradaman is ready to be served. It tastes great when served on the plantain leaf with banana. I did have mine in the same way. Now the secret to a better tasting pradaman depends on how long you stir the jaggery- chana mixture. I did mine for almost an hour and that definitely made my pradaman yummy. Back home my mom's assistant is my dad for stirring the pradaman since that is the most tedious job.

I hope you guys try this one. Be back soon with more cakes and recipes...

ENJOY!!!


Friday, August 5, 2011

Fresh Fraisiers

The July 2011 Daring Bakers challenge was to make the Fresh Fraisiers. This months host for the challenge was Jana from Cherry Tea Cakes and she was inspired by this recipe from the cookbook Tartine. I missed a couple of the DB challenge and was looking forward to do this one. The minute I saw the challenge, was really excited in trying this out. It was the first time that I even heard about this dessert. Well it tastes also amazing!!! Lets get started.


We are using strawberries which is the standard ingredient for the Fraisiers. But you are free to use any fruit for that matter. Since this was my first time making them and I didnt want to mess up this beautiful dessert, I chose to stick to the recipe as far as I can. But I did choose to make the coconut chiffon cake.

The recipe is explained in each step. So here you go with the ingredients and directions.

Coconut Chiffon Cake

1 cup plus 2 tbspn all purpose flour
1 tspn of baking powder
3/4 cups of sugar
1/4 tspn of nutmeg
1/2 tspn of salt
1/8th cup of vegetable oil (30 ml)
3 large egg yolks
1/3 cup of water (65ml)
5 large egg whites
1/3 cup of unsweetened coconut milk

Direction:

Preheat the oven at 325 degree F. You will need to use a spring form pan about 8'. Line the pan with parchment paper(butter paper).
In a mixing bowl, add flour, nutmeg, salt, baking powder and 3 tbspn of sugar. Mix well.
In another bowl, mix together the egg yolks, oil, water and coconut milk. Use a hand mixer to blend all the ingredients.
Combine the dry and wet ingredients. They should be mixed thoroughly until smooth. Keep it aside.
Take the egg whites in a bowl and using the hand mixer, beat at medium speed until it doubles and makes soft peaks. Now add the remaining sugar and beat on medium speed until they hold firm and becomes shiny peaks.
Now add 1/3 of the white mixture into the batter prepared earlier and fold them together with a spatula. Gently fold the remaining white mixture until combined. It is important in this step that you fold the mixture and not stirring it. Here is the link which explains how to fold in the ingredients: http://www.youtube.com/watch?v=vP4vbktd-PM
Pour the batter into the pan and bake it for 45-55 mins or until done. You can test it by inserting a toothpick/fork and it should come out clean.
Set the cake aside to cool.

Pastry Cream

1/2 tspn vanilla extract
1 cup milk
1 cup heavy cream
2 tbspn corn starch
1/4 cup sugar
1/8 tspn salt
1 egg
2 tbspn unsalted butter
3/4 tspn gelatin
1/2 tbspn water

Directions:

Heat milk, vanilla and salt in a heavy bottom sauce pan on medium heat. Stir in occasionally  bring this near to a boil.
In a bowl add the sugar and corn starch and mix well. To this add the eggs and combine until smooth.
Pour the heated milk to the egg mixture. This should be done while whisking, it is advisable to use a stand mixer. But I used a hand mixer and it was fine. Make sure the milk is poured slowly and pour it from the side of the bowl into the egg mixture.
Now pour this mixture back to the saucepan and cook on medium heat. The mixture should be cooked until it become custard thick. Stir continuously. My mixture had bubbles while heating, was worried if it was spoiled. But once it started cooking, it turned to be fine and became perfect custard thick.
Once it reaches the required consistency, remove from heat and pass it through a mesh sieve into a bowl. Allow it to cool, stirring occasionally.
Cut the butter into small pieces, add into the pastry cream one at a time. Blend the butter into the cream. The butter should melt with the heat of the cream. Whisk until the cream is smooth.
Cover the cream with plastic wrap. The plastic wrap should be pressing to the cream, to avoid the skin forming on the top. You can keep this refrigerated upto 5 days.
Sprinkle gelatin over water in a separate dish and let it soften.
Take 2 inches of water in a saucepan and bring it to a simmer. Take 1/4 cup of the pastry cream in a stainless steel bowl that will sit on the saucepan without touching the water.
Heat the cream until 120F. I didnt have any device to check the temperature. I heated it until it was smooth and became a little loose consistency. The cream was just warmed.
Add the gelatin to this and whisk until smooth. Remove from the simmering water. Add the remaining pastry cream and incorporate them.
Whip the heavy cream in a bowl until soft peaks are formed. Fold in the whipped cream into the pastry cream. They should be incorporated by folding with a spatula.


Simple Syrup

1/3 cup sugar
1/3 cup water

This syrup is used to moist the cake. Combine water and sugar in a saucepan and heat it over medium heat. Bring it to a boil. Cool the syrup.
You may also add flavor if required. I kept it simple without any flavoring added.

Chocolate Mirror Glaze


1 cup heavy cream
3/4 cup semisweet chocolate chips
2 tbspn unsalted butter
1/2 tspn gelatin
2 tbspn water

In a saucepan heat the heavy cream on medium. Remove it from heat just before it boils.
Sprinkle the gelatin in a dish over water and keep it aside to soften.

Add the butter little by little and whisk for 1 min.
To this add the gelatin and mix well. Keep it aside.

Assembly of the Fraisier


1 pound fresh Strawberries
1 Chiffon Cake
Pastry Cream
Simple Syrup
Chocolate Mirror
1/2 cup White Chocolate

The 1st step is to prepare the spring form pan. Line the 8' pan with parchment paper on the sides. You can also use the plastic wrap.
Cut the Chiffon cake into half horizontally. Place the bottom layer of the cake on the prepared pan.
Moisten the cake with simple syrup evenly.
Cut the strawberries in half. Place the them on the sides of the pan, with the cut side facing the pan and the point side up forming a ring. You may arrange the strawberries close to each other. I decided to have spacing between each strawberry.
Now pipe the pastry cream between these strawberries and a thin layer on the cake.
Place the remaining strawberries on the cream. If you have the cream left, pipe it on top of the strawberries filling the gap and smoothing it out.


Place the 2nd half of the Chiffon cake on top. Moist with the simple syrup evenly. The fraisier is ready. You have to refrigerate for 4 hours before serving.  But I wanted it to look beautiful. So the Chocolate mirror is my version added.
Pour a thin layer of Chocolate mirror on top of the cake. Refrigerate the fraisier for 1 hour.
Pour another layer of the Chocolate mirror and refrigerate for another 4 hours. Cover the fraisier with plastic wrap while refrigerating.
Before serving remove the spring form and parchment paper.

I melted white chocolate chips and pipped it on the chocolate mirror once set. This was just for the decoration. It is purely optional.

Things I did wrong:
- Using frozen strawberries. Never use frozen fruits unless mentioned in the recipe.
- Rather than refrigerating the fraisier, I froze it. It was my first attempt with the chocolate mirror. For speedy setting, I kept the fraisier in the freezer. Which didnt help the chocolate mirror to set. So never try that.

But finally I did get a beautiful and tasty fraisier treat. Even though this recipe is lengthy, its easy to make. So guys try it out. I had great fun with this challenge of DB. Excited and looking forward for the next one.

ENJOY!!!!


Tuesday, March 1, 2011

** Creamy Treat for February** Daring Bakers Challenge!!


Each month I eagerly wait for the new challenge with the Daring Bakers. I was really excited about the January challenge. I did participate in it but didnt post it here.  Didnt turn out how I wanted it. I am all determined to try it again and post that soon.

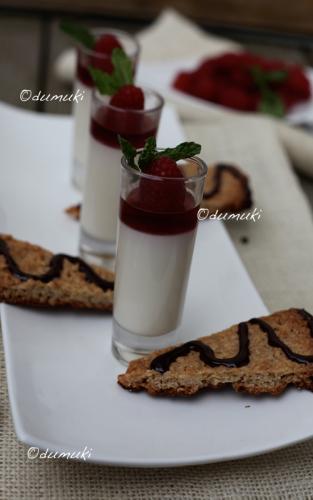
Since the last challege didnt come out just right, I was waiting for the next challege. Trying to guess what it was going to be this time. And again this time too it was something new to me. Never heard of this amazing Italian Dessert. The February challenge was hosted by Miss Mallory from A Sofa in the Kitchen. Miss Mallory challenged us to make the creamy silky Panna Cotta with Florentine Cookies. I must say that these challenges help me learn new techniques and recipes.

Panna Cotta is made with simple ingredients. There are many varities of Panna Cotta. Its usually paried with fruits, berries, caremel, gelee, chocolate sauce. We can play with this dessert by trying different ways of layering the dessert. This is one of those desserts where you can amaze your guests with the presentations.


Panna Cotta with Raspberry Jelly

Ingredients

- 1 cup whole milk
- 1 tablespoon unflavored powdered gelatin
- 3 cups heavy cream
- 1 tablespoon granulated sugar
- 1/3 cup honey
- Pinch of salt

 For Raspberry Jelly

- 2 Tbspn cold water
- 1/2 tspn powdered gelatin
- 1/2 cup raspberry juice

Method

1.Pour the milk into a bowl  and sprinkle gelatin evenly over the milk. Let stand for 5 minutes to soften the gelatin.
2.Pour the milk into the saucepan/pot and place over medium heat on the stove. Heat this mixture until it is hot, but not boiling, about five minutes. Whisk it a few times.
3. Add sugar, cream, honey and pinch of salt to this. The mixture should not boil, continue to heat until the sugar is dissolved which takes about 5 minutes.
4.Remove from heat, allow it to sit for a few minutes to cool slightly. Then pour into the glass or ramekin. Refrigerate at least 3-4 hours untill its set.

Raspberry Jelly

1. In a bowl, sprinkle the powdered gelatin over the cold water. Let stand for 5 minutes.
2. In a saucepan, combine the raspberry juice gelatin. Cook over medium heat, stirring until the gelatin dissolves. make sure this mixture is not let to boil.
3. Remove from heat  Let cool .
4. Pour the raspberry jelly over the panna cottas, and return to the refrigerator for another 4 hours.
5. Remove from refrigerator and garnish to serve.


Florentine Cookies

Ingredients

- 2 cups quick oats
- 2/3 cup  unsalted butter
- 1 cup sugar
- 2/3 cup all purpose flour
- 1/4 cup whole milk
- 1 tsp vanilla extract
- pinch of salt
- 1/2 cups dark  chocolate melted (optional)

Method

1. Preheat oven to  375 degree F. Prepare the baking sheet with parchment paper.
2. Melt the butter in a saucepan over medium heat. Remove from heat once melted.
3. To the melted butter add oats, sugar, flour, milk, vanilla, and salt. Mix well.
4. Drop a tablespoon full, three inches apart onto your prepared baking sheet. Flatten slightly with the back of your tablespoon
5. Bake this for about 10 mins or until the cookies turn golden brown. Cool the cookies.
6. Melt the chocolate in the microwave until smooth. Garnish the cookies with the chocolate.


Guys this is one amazing dessert which is very easy to make. Try it out. Enjoy!!!

Thursday, December 2, 2010

***Daring Bakers Challenge : CROSTATA****

This is my first Daring Bakers Challenge. For November, 2010 the challenge was hosted by Simona from briciole. The challenge was to make Crostata.

Crostata is an Italian baked dessert tart or form of a pie. It is traditionally prepared by folding the edges of the dough over the top of the filling. Crostata doesn't have a regular circular shape, it has more of a rough looked edges. The filling is usually jam or marmalade.Crostata is also made using fresh cut fruits or cream as filling.

Not only was this my first Daring Bakers challenge, it was also my first time baking Crostata or a pie. I was all excited to see the end result.


The filling I used for the Crostata was fruits which included fresh apples and pears. You will need the following ingredients:

- 13/4 cup of all purpose flour
- 1/2 cup superfine sugar (used powdered sugar)
- 1 stick unsalted butter (8 tablespoons) - room temperature
- pinch of salt
- 1 large egg and 1 large egg york
- grated zest of half lemon
- Thinly sliced fresh fruits

To make the Crostata we need to start with the pasta frolla. Making the frolla:
1. Combine flour, sugar and salt in a large mixing bowl.
2. Cut the butter into small pieces and add into the mixture. Mix well until its well blended.
3. Make a well in the center of the mixture and pour the beaten eggs. Also add the lemon zest to your    mixture.
4. Use a fork to incorporate the liquid and then use your hand to knead the dough.Knead it until the dough can be made into a ball.
5.Cover the dough in a plastic wrap and refrigerate it for 2 hours.

Assembling the Crostata:
1. Preheat the oven to 375 F.
2. Butter a flat bottom pan which is about 12 inch.
3. Roll out the dough to somewhere between a quarter and a half thick. It should be rolled out enough so that it covers the whole pan. Cut out the remaining dough for cutting decorate strips for the end.
4. Transfer the rolled out dough into the prepared pan. Prick holes with a fork on the dough.
5. Now layer the fruits in circular manner or anyway you would like it to look.
6. Reroll the extra dough which was set aside. Cut out thin strips and layer them on top of the fruits. Its like covering the pie. You can make the net impression. After layering, create a small ring around the rim of the Crostata. It gives a finished look.
7. Now brush some egg wash on the top of the pie. I also added some peanuts on top.
8. Bake the Crostata for about 30 mins or until it turns golden brown.


You have the Crostata ready. I was not really found of pies but really liked this one. Try out this and post your comments on how it turned out.

Thank you to Daring Bakers Challenge for this one. Looking forward for more challenges.


ENJOY!!!!!

Sunday, October 24, 2010

****Spring Rolls****


Spring rolls are famous Asian appetizers. There are different variations to this in the east Asian countries. In China, Spring rolls are made during their annual Chinese New Year, called Spring Festival and this is were it gets its name. Usually made out of the fresh vegetables from their first harvest, later on it was added with meat.

My love for spring rolls started during college days. I was so fond of this appetizer, we would go to our favorite restaurant just to have the vegetable spring rolls (why vegetarian, because my friend is a veggie). Never bothered to find out how its made. It was a long time ago. When I started missing those yummy spring rolls, decided to check out how its made. And now I can say that am an expert making that. Dont get scared by the simple elegance they show off, spring rolls are easy to make.

And here you go with my own version of the recipe....This recipe makes about 15 spring rolls.

Ingredients:

- Pre-made Frozen wrappers
- 1/4th Cabbage (shredded)
- 1 Carrot (shredded)
- 2 spring onions (chopped)
- 1 cup Boneless chicken (cooked and shredded)
- 1 cup Rice noodles (cooked) - optional
- 2 tablespoon soya sauce
- 1 teaspoon sugar
- Salt  (to taste)
- Oil for stir fry and deep frying

This recipe is of non veg spring rolls. Avoid the chicken for the vegetarian. However you are free to add different kinds of meat and veggies according to your preference.

Method: 

- Pour 2 tablespoon oil into a wok or frying pan and heat it at medium to high. Once the pan is hot enough, add the shredded cabbage, carrot and spring onions. Stir fry for a min until the vegetables are soften a little.
- Add soya sauce, sugar and salt to this. Mix well for another min and remove from heat.
- Add the rice noodles and shredded chicken to this mixture. Blend all this together.
- Next step is to assemble the spring rolls. Thaw the frozen wrappers. Once you take the wrappers out of its packet, make sure to cover the rest of it with a wet cloth while you are working with one wrapper. Otherwise the wrappers drys off and would tier off.
- Place once sheet on a clean surface. Take 1 tablespoon of the filling and place it at one corner of the sheet. Spread the filling in length wise. The step by step method of folding the sheet is shown below:


-To secure the rolls, wet the tip with water and pasting it shut.
- Now prepare the wok for deep frying. make sure the oil is very hot before placing the spring rolls. Deep fry them until golden brown.

Your spring rolls are ready to serve. ENJOY!!!


Try out this wonderful snack and do leave a comment on your experience.....

Sunday, October 17, 2010

***Cutest Cake I Ever Baked***

My love for baking started a very long time ago. Each time I visit a bakery, used to wonder how these beautiful cakes were baked and looked so perfect. My mom never baked so always thought it was difficult and couldn't make one at home. Later on when I was on my own and into experimenting all kinds of cooking, did some research on baking. Started trying out different kinds of cakes, realized it was not so tough. Now I am all into baking and cake decoration.

About 2 weeks back we got an invite for a baby shower of our friends Mary and Ruben. They are having a baby boy. We wanted to do something special for them and it was Briji's idea to bake a cake with the little baby boy theme. We got excited on the project and did a lot of research. Finally Briji came up with a beautiful design for the cake and I was all set to make it.

The design had little baby shoes and a blanket. The cake was designed to reflect a messy baby :). The color scheme was blue since its a boy. The flavor was chocolate with chocolate whipped cream filling. The filling was three layer.


The difficult part was to get the little shoes done. We made the template for the shoes first. The material used to make the shoes were gumpaste and fondant. It took me more that 2 hrs to make the shoes and was so amazed by the result. They looked stunning. It was the photo session for the shoes. Briji wouldnt let go of them.

Assembling the rest of the cake was easy. I am posting here just the chocolate cake recipe. Will be giving a detailed description of the shoe making and the icing in another posting. So stay tuned for that one.

Chocolate cake

Ingredients:
1 1/2 cup All purpose flour
2 cups Sugar
3/4 cup Cocoa powder
2 teaspoon Baking soda
1 teaspoon Salt
2 Eggs
1 cup Milk
1/2 cup Oil
2 teaspoon Vanilla essence
1 cup Boiling water

Method:

-Preheat the oven at 350 degree and prepare the pan.
- Mix in all the dry ingredients (flour, sugar, cocoa, salt and baking soda) in a bowl.
- To this add the wet ingredients starting with the eggs. Mix well. Pour in the boiling water last and blend well with a mixer.
- Pour the cake batter into the pan and bake it for 1 hour or until a toothpick is inserted and comes out clean.
- Cool the cake before decorating or cutting it.

This is a basic chocolate recipe. This cake is also yum to eat with ice cream.

Final cake....

Mary and Ruben loved this cake and we were happy. Congratulations to them and also wish them a wonderful parenthood.